If you're getting errors when trying to format your USB flash drive in Windows File Explorer (such as "Windows was unable to complete the format"), you can still format the drive using Command Prompt. This comprehensive guide teaches you how to erase and reformat your flash drive using the DiskPart tool.
Why Use Diskpart for USB Formatting?
Diskpart is Microsoft's command-line disk partitioning utility that offers more control than the standard formatting tools. It's particularly useful when:
- File Explorer format fails
- USB drive shows incorrect capacity
- Drive is corrupted or has bad sectors
- You need to remove write protection
- Standard formatting tools don't recognize the drive
Things You Should Know
Important Preparation Steps:
- Plug the USB drive into your computer before starting
- Run CMD or PowerShell as Administrator
- Back up data: This process erases everything on the drive
- Identify correct disk: Using wrong disk number can erase other drives
Step-by-Step Guide: Reset USB Drive to Factory Settings
Step 1: Plug Your USB Drive
Insert the USB drive into any available USB port on your computer. Wait for Windows to recognize it (even if it shows an error).
Troubleshooting: If the drive doesn't appear in File Explorer, it may still work with Diskpart.
Step 2: Open Command Prompt as Administrator
- Press Windows + R keys
- Type
cmdand press Ctrl + Shift + Enter (opens as admin) - Click Yes on the UAC prompt
Alternative method: Search "cmd" in Start menu, right-click, select "Run as administrator"
Step 3: Launch Diskpart
Type the following command and press Enter:
diskpartYou'll see the Diskpart prompt: DISKPART>
Step 4: List All Disks
Type and execute:
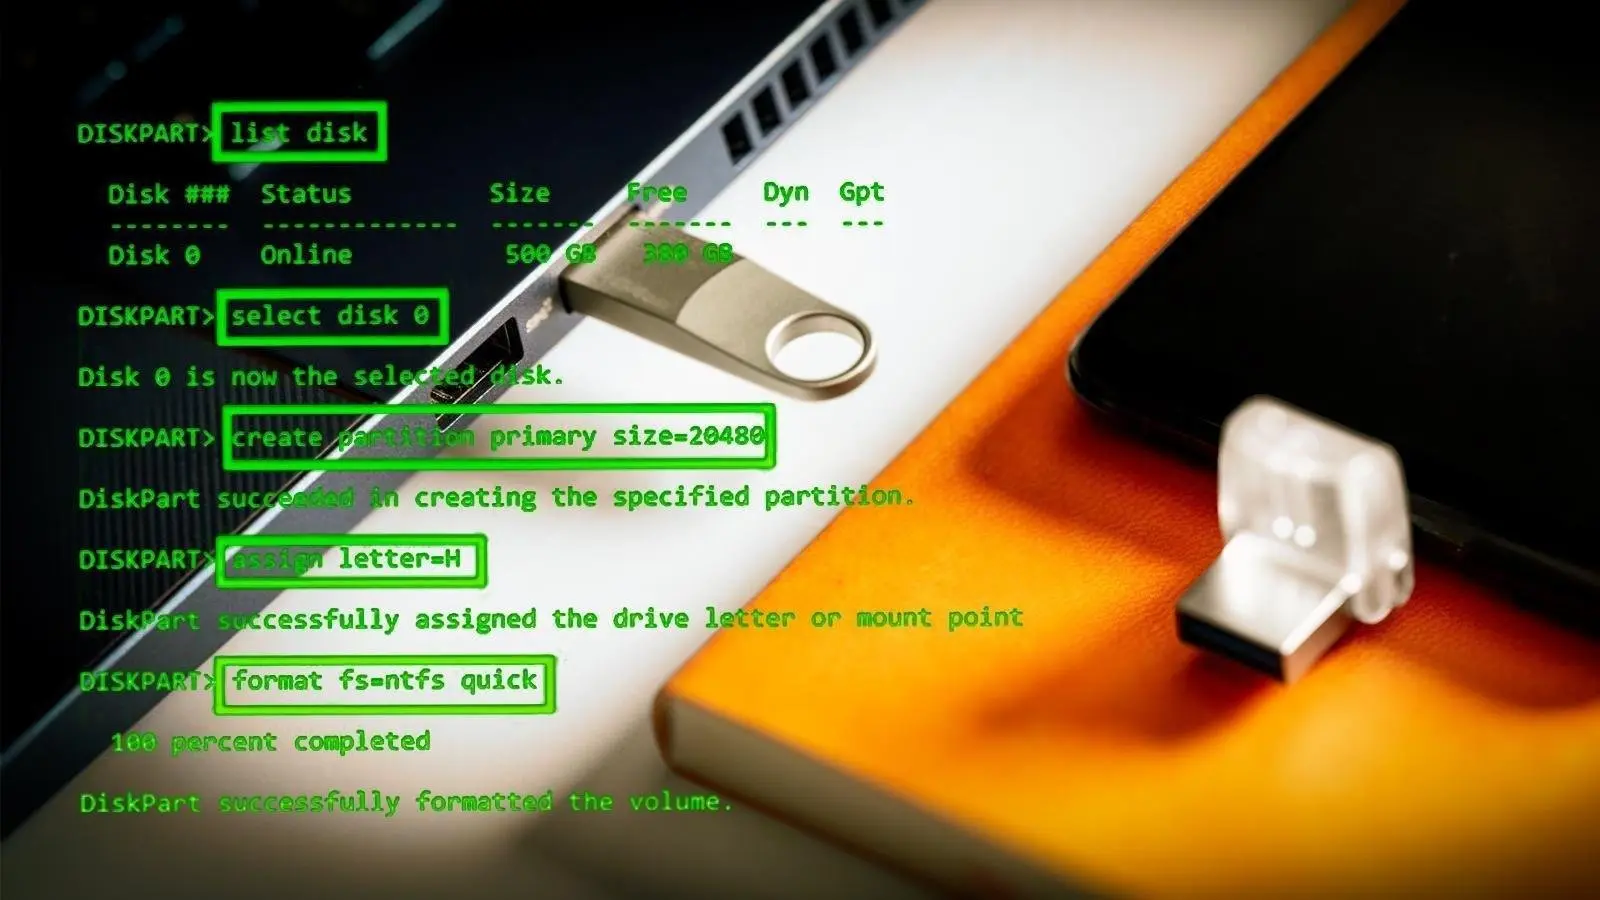
list diskThis displays all storage devices. Identify your USB drive by size. Example output:
Disk 0    238 GB   Online
Disk 1     32 GB   Online    <-- This is likely your USB drive
Disk 2    500 GB   Online
Warning: Double-check the size to avoid selecting the wrong disk!
Step 5: Select Your USB Disk
Replace [number] with your USB drive's disk number:
select disk [number]Example: select disk 1
You'll see: "Disk [number] is now the selected disk."
Step 6: Clean the Disk
This removes all partitions and data:
cleanWait for confirmation: "DiskPart succeeded in cleaning the disk."
What this does: Removes all partition information, making the drive like new.
Step 7: Create Primary Partition
Create a new partition:
create partition primarySuccess message: "DiskPart succeeded in creating the specified partition."
Step 8: Format the Drive
Choose your file system. For USB drives, NTFS is recommended:
format fs=ntfs quickFile system options:
- NTFS: Best for Windows, supports large files (>4GB)
- FAT32: Compatible with all devices, but 4GB file size limit
- exFAT: Good cross-platform compatibility, no file size limit
To use FAT32: format fs=fat32 quick
To use exFAT: format fs=exfat quick
Wait for: "DiskPart successfully formatted the volume"
Step 9: Assign Drive Letter
Assign a specific drive letter (optional but recommended):
assign letter=FReplace F with any available letter. Windows will confirm: "DiskPart successfully assigned the drive letter or mount point."
Step 10: Exit Diskpart
exitYour USB drive is now reset to factory settings and ready to use!
Advanced Options and Troubleshooting
Remove Read-Only Protection
If your USB is write-protected:
attributes disk clear readonlyFull Format vs Quick Format
For a thorough format that checks for bad sectors, omit "quick":
format fs=ntfsNote: Full format takes much longer but is more thorough.
Check Disk for Errors
After formatting, verify the drive:
chkdsk F: /fReplace F: with your drive letter.
Common Error Messages and Solutions
"Virtual Disk Service Error"
Solution: Restart Virtual Disk Service:
- Press Windows + R
- Type
services.msc - Find "Virtual Disk"
- Right-click and select "Restart"
"Access is Denied"
Solution: Ensure you're running CMD as Administrator
"Diskpart has encountered an error"
Solution: USB drive may be physically damaged. Try another USB port or computer.
Best Practices for USB Drive Maintenance
- Safely eject: Always use "Safely Remove Hardware"
- Regular formatting: Format every 6-12 months for optimal performance
- Avoid frequent writes: Flash memory has limited write cycles
- Keep backups: USB drives can fail without warning
- Use quality brands: Cheap USB drives fail more frequently
Choosing the Right File System
| File System | Max File Size | Compatibility | Best For |
|---|---|---|---|
| NTFS | 16 TB | Windows (Mac read-only) | Windows-only drives, large files |
| FAT32 | 4 GB | All devices | Maximum compatibility |
| exFAT | 16 EB | Modern devices | Cross-platform with large files |
Video Tutorial Alternative
Prefer visual learning? Search YouTube for "Diskpart USB format tutorial" for video walkthroughs of this process.
Conclusion: You now have the complete knowledge to reset any USB drive to factory settings using Windows Diskpart utility. This method works for USB flash drives, external hard drives, and SD cards. Remember to always double-check the disk number before cleaning to avoid data loss on the wrong drive.

Leave a comment
Your email address will not be published. Required fields are marked *